The Curricula section of ETR is a tool for creating and editing Training Syllabi, which can be then enrolled as a Training Courses via the Training section.
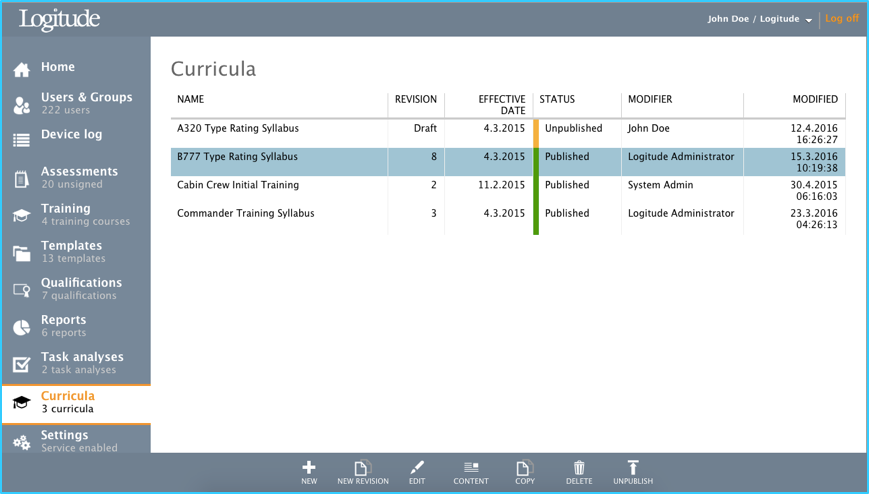
The Curricula menu shows Curricula sorted in alphabetical order.
Creating, editing, copying and deleting Curriculum
Clicking the toolbar button "New" opens the “Create New Curriculum” dialog. This dialog has two tabs:
General tab:
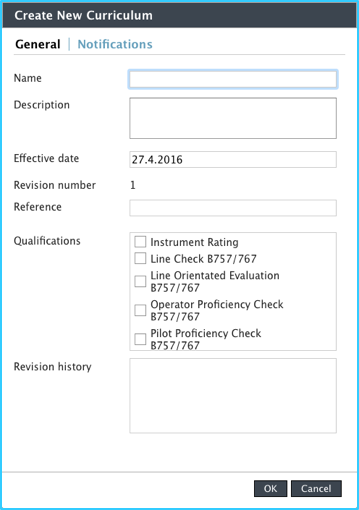
- Name: Name of the Curriculum. Mandatory
- Description: Description of the Curriculum. Optional.
- Effective date: Clicking on the input field opens up a date pick tool, but it is also possible to * input the date in format DD.MM.YYYY. Optional
- Revision number: This is an automated revision number based on the revisions made to the Curriculum via the “New revision” function.
- Reference: Optional, can be used to reference specific company documents relating to this Curriculum.
- Qualifications: Qualifications linked to this Curriculum. Each trainee who completes this Curriculum, will be given selected qualifications or the qualifications will be renewed.
- Revision history: Automated list with all revisions of this Curriculum
Notifications tab:
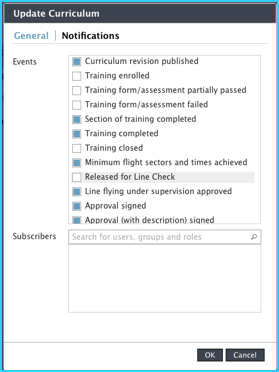
Select all events which will trigger a notification email to be sent to subscribers listed below. Subscribers can be either individual users or user groups.
After creating a curriculum, it is listed on the Curricula menu.
"Edit" toolbar button activates only when Curriculum or revision of it is selected. Clicking edit button opens the “Edit Curricula” dialog, which is the same dialog as when creating a new curriculum.
When editing a Curriculum, that is or has previously been published, it is not possible to edit any of the details via Edit dialog. Only viewing of the information and accessing the previous revisions are available.
Curriculum can be copied by selecting "Copy" toolbar button, which activates when curriculum is selected from the list.
Deleting curriculum is done by selecting it from the list and then clicking "Delete" toolbar button. This opens the confirmation dialog to prevent accidental deletions.
Publishing and unpublishing Curriculum
In order to use the created Curriculum in training courses, the curriculum must be first published. This is done by selecting the curriculum and selecting toolbar button "Publish".
Once a Curriculum is published for the first time, no further editing is allowed. For this reason, publishing of a Curriculum requires user confirmation in a dialog that opens. To edit published Curriculums, it is recommended to create a new revision.
Published Curriculums can be unpublished, preventing them to be selected for new training courses. Unpublishing is done by selecting published Curriculum and then clicking toolbar button "Unpublish".
Create new revision of Curriculum
The toolbar button "New Revision" activates only when a Curriculum that is already published, is selected. Because editing of published Curriculum is not possible, all editing is done via new revisions. Clicking this button creates a new revision of the selected Curriculum using the same content. Revision is linked to the original Curriculum and shown underneath it on the Curricula view:

New Revisions can be edited, copied, deleted and the content can be edited. Revision number and revision history are automatically maintained when using “New Revision” function. When the new revision is published, it will replace the previously published version of the Curricula.
Curriculum Editor
To edit the content of the Curriculum, select the Curriculum or its revision from the Curricula list and click “Content” toolbar button. Content editor will open:
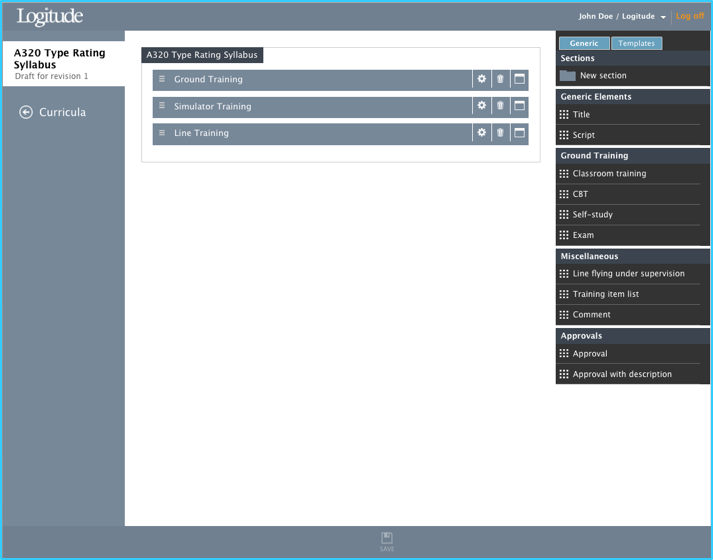
On the bottom there is toolbar button for saving the Curriculum content.
On the right side, there is Toolbox which has two tabs: Generic and Templates. Sections and elements are dragged from Toolbox to the Curriculum content area, which is in the center.
Curriculum Editor Toolbox
The Toolbox on the right side contains all elements that can be drag and dropped inside the Curriculum. Toolbox has two tabs, Generic and Templates.
The Templates tab link directly to published templates sorted under each Task Analysis. These templates can be directly dragged onto a Curriculum, as a simulator training items or skill test items for example.
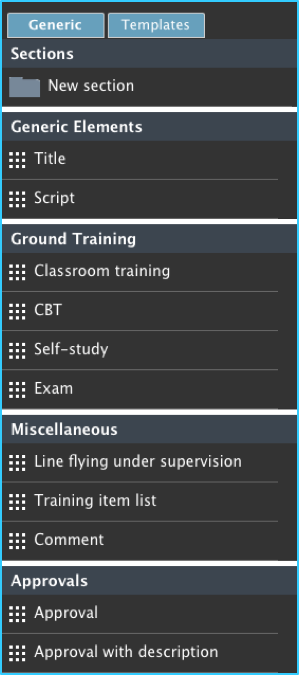
The Generic tab elements are presented in detail below:
Sections
New section – Insert new section, which can house other elements. Training elements need to inserted inside a section.
Generic Elements
- Title – Can be either outside or inside of a section. Free text field.
- Script – Can be either outside or inside of a section. Free text field.
Ground Training elements
Classroom training
Can only be inserted inside of a section.
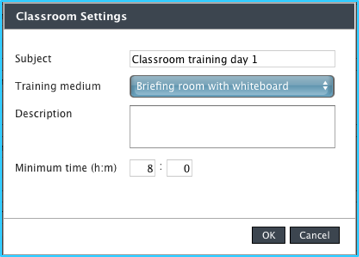
- Subject: Name of the element. Free text.
- Training medium: Select applicable training medium for this training from the list. These mediums are defined in the Task Analysis -> Training media.
- Description: Free text
- Minimum time: This time must be achieved when completing this training item.
CBT
Can only be inserted inside of a section.
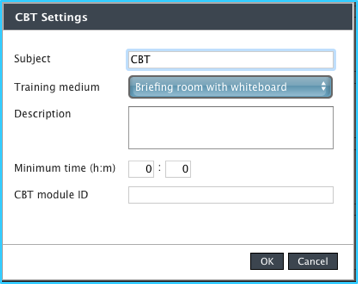
- Subject: Name of the training element. Free text.
- Training medium: Select applicable training medium for this training from the list.
- Description: Free text.
- Minimum time: This time must be achieved when completing this training item.
- CBT Module ID: This field can be used for referencing the exact CBT module by its ID.
Note. On CBT element, the approvers list contains “trainee” by default in order to trainees to be able to check these items as complete.
Self-study
Can only be inserted inside of a section.
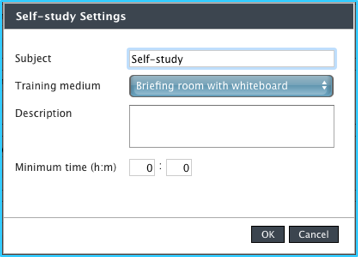
- Subject: Name of the training element. Free text.
- Training medium: Select applicable training medium for this training from the list.
- Description: Free text.
- Minimum time: This time must be achieved when completing this training item via Training. Courses.
Note. On Self-study element, the approvers list contains “trainee” by default in order to trainees to be able to check these items as complete.
Exam
Can only be inserted inside of a section.
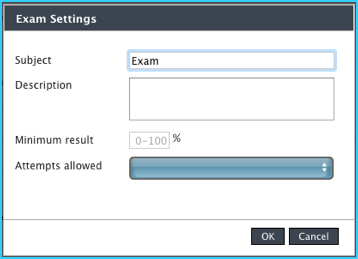
- Subject: Name of the training element. Free text.
- Training medium: Select applicable training medium for this training from the list.
- Description: Free text.
- Minimum result: Minimum result for passing this exam element.
- Attempts allowed: Maximum number of attempts allowed to take this exam. Can be selected from a list of 1-10, or “not limited”.
Miscellaneous elements
Line Flying Under Supervision (LIFUS)
Can only be inserted inside of a section.
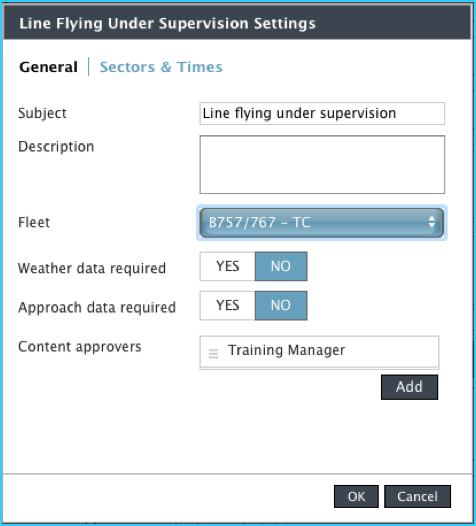
General Tab
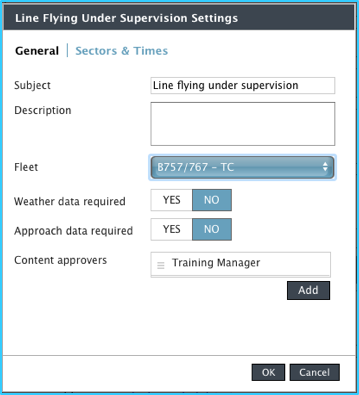
- Subject: Training element subject. Free text.
- Description: Free text.
- Fleet: Select fleet from published Task Analyses.
- Weather data required: if “YES”, weather data must be inputted for each sector.
- Approach data required: if “YES”, approach data must be inputted for each sector.
- Content approvers: Specify which users can approve the whole LIFUS module as completed.
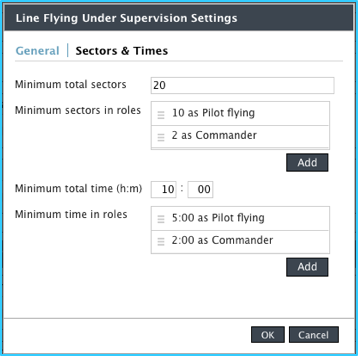
LIFUS Sectors & Times Tab
-
Minimum total sectors: Specify minimum number of sectors for LIFUS training.
-
Minimum total sectors in roles: Specify minimum number of sectors in specified roles.
-
Minimum total time: Specify minimum total time for LIFUS training.
-
Minimum time in roles: Specify minimum time for specified roles.
Training Item List
Can only be inserted inside of a section.
Use this element to create a sort of a “todo” list for each trainee, that they must complete during the training course.
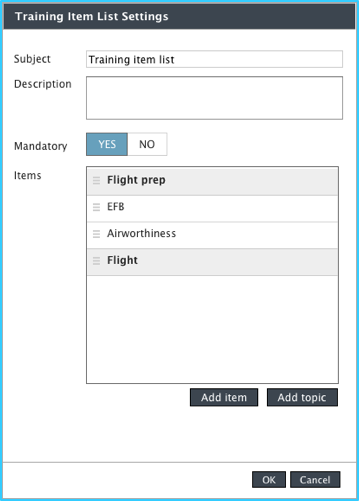
- Subject: Subject for the list. Free text.
- Description: Free text.
- Mandatory: If YES, this list and all items in it are mandatory to complete
- Items: The list of items, which can be divided under topics.
Use “Add item” and “Add topic” buttons the create the list. Items can be moved by dragging.
Comment
Can only be inserted inside of a section.
This element can be used to give comments to trainees during the course.
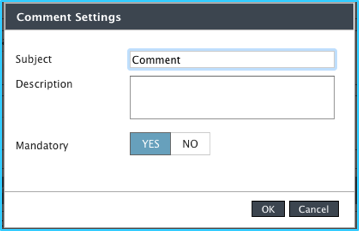
- Subject: Subject for the comment element. Free text.
- Description: Free text.
- Mandatory: If YES, this list and all items in it are mandatory to complete
Approvals
Can only be inserted inside of a section.

- Approval – This element can be used to get an approval during the course, for example from Head of Training, before progressing to next section or before the training course is fully completed.
- Approval with description – same as “Approval”, but with editable description.
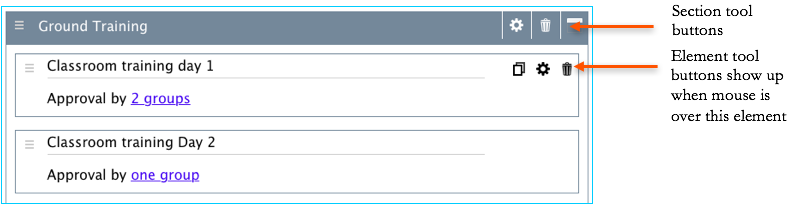
Curricula Editor Element Tool Buttons
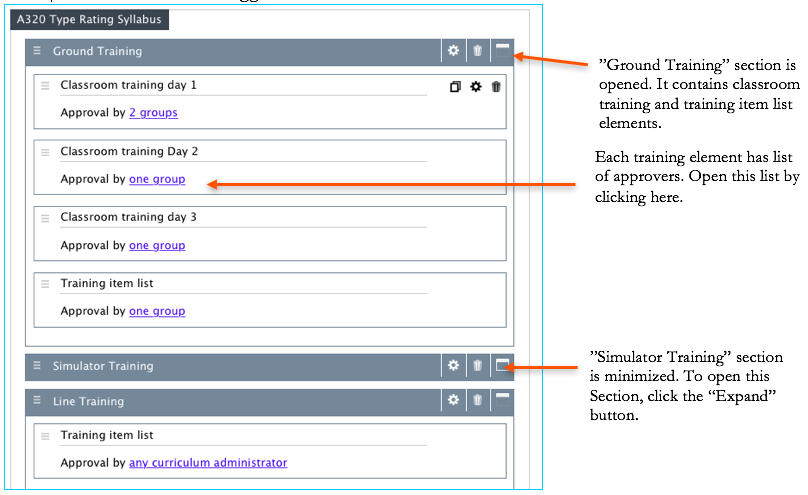
Each section and element has Tool Buttons on the upper right corner. For sections, these are always visible, but for elements they show up when the mouse cursor is over the element:
To open a section, click the “Expand” button:
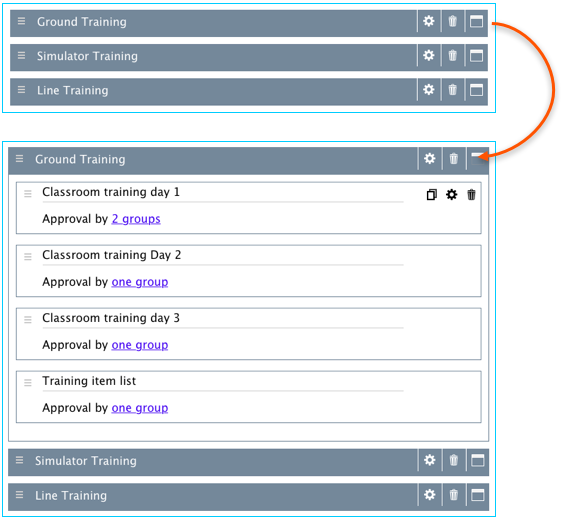
Moving sections or elements is done by dragging the item to different position:
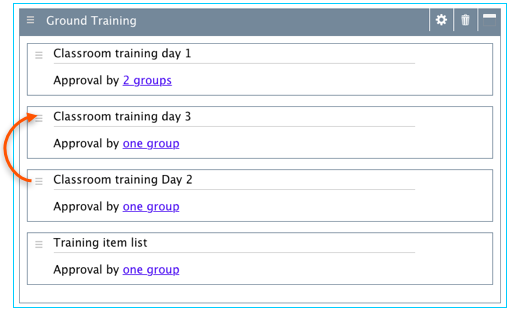
After moving Day 2 in front of Day 3 element, the orange highlight indicates that there are unsaved changes in the Curriculum. Also the toolbar button “Save” becomes active.
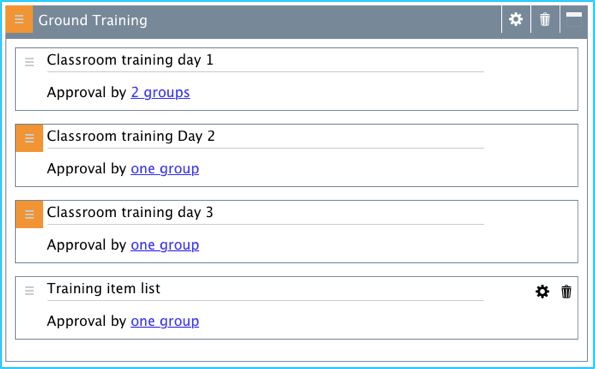
Clicking “Save” on the toolbar saves the Curriculum and removes the orange highlights.
Settings of a section are shown in a dialog below:
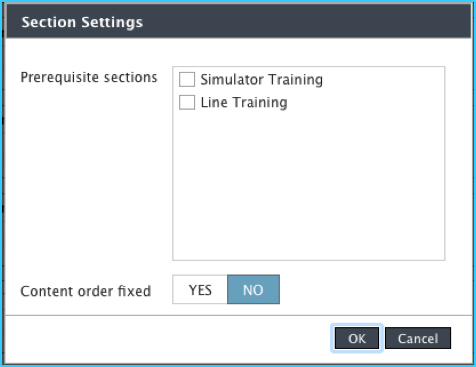
To create Curriculum with fixed order of sections and training elements inside section, use Section Settings to define:
-
Prerequisite sections: which sections need to be completed before section selected can be completed
-
Content order fixed: YES/NO, if selected YES, the completion of elements inside this section must be done in fixed order.
Settings of the training elements vary depending on the element.
Training Element List of Approvers
Each training element has configurable list of approvers. By default, in most of the training elements “Curriculum administrators” are on the approvers list by default. Note that elements “Self-study” and “CBT” contain also trainee on the approver list by default.
To access the approvers list, click the link inside the element on the editor:

This opens the “Manage Approvers” dialog:

Approvers can be individual users, user groups, or the trainee himself/herself. To add approvers, double-click the user on the “All approvers” column. There is also a search tool for finding the specific user(s) quickly.
To remove approvers from the list, double-click the username on the “Selected approvers” column.
Unlike other training elements, The LIFUS module has two separate approvers groups instead of just one. The approver groups for LIFUS element are flight sector approvers and content approvers.
Flight sector approvers are set by clicking the link on the LIFUS module itself:

These users can only approve flight sectors inside the LIFUS element, but not the whole LIFUS element once all required sectors are complete.
Content approvers list is managed via LIFUS module settings, under “Content Approvers”
These Content Approvers can add line flying sectors and also approve the whole LIFUS training complete after all requirements are met.