Admins can perform following tasks on Training section:
- Create and edit Training Courses based on Curricula
- Enroll and manage users for Training Courses
- Monitor Training Course progress
- Configure and run reports on ground training and flight times
- Approve and sign completed training elements
- Print trainee certificates for completed Training Courses.
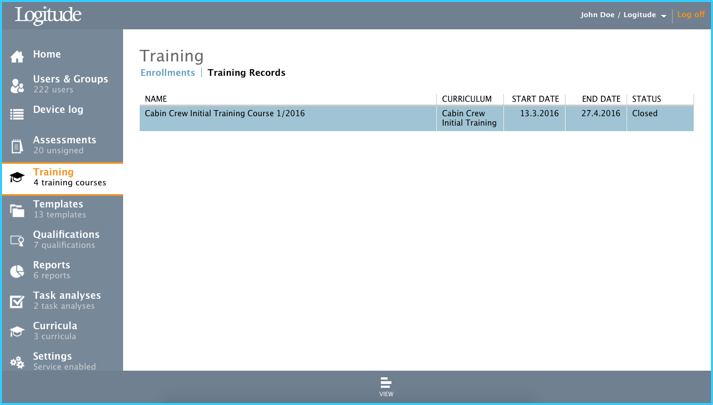
The Training view has three tabs, Enrollments, Reports and Training Records.
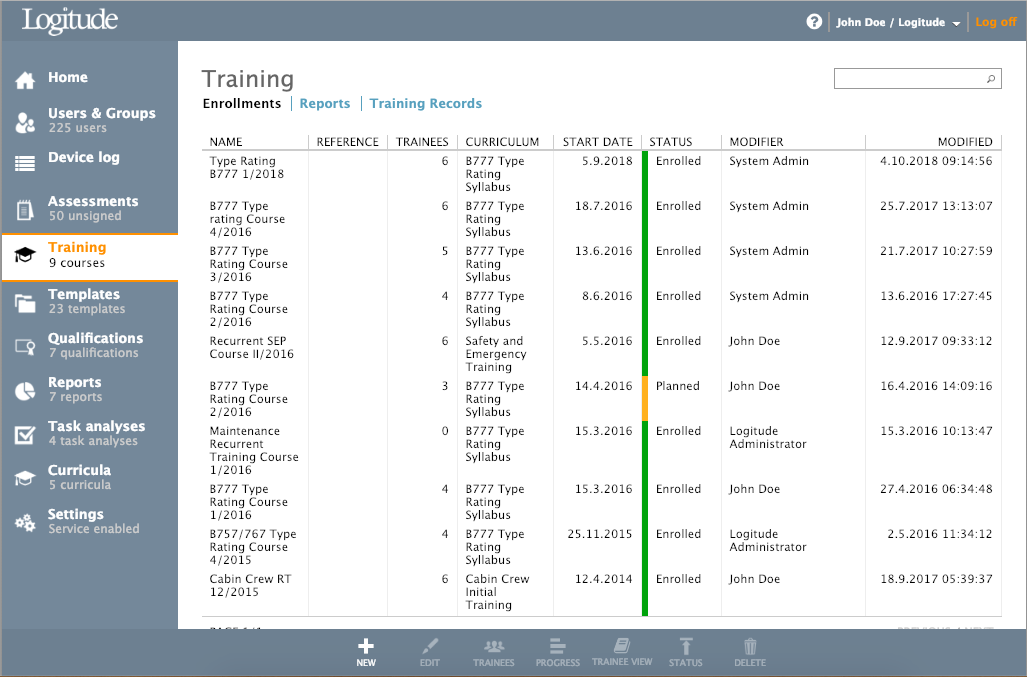
Enrollments tabs
Enrollments tab shows all planned and active Training Courses and provides tools for creation, managing and deleting training courses. Double-clicking Training Course opens it in Progress view.
Creating, editing and deleting training course
Clicking toolbar button "New" opens "Create New Training Course" dialog. The dialog has two tabs:
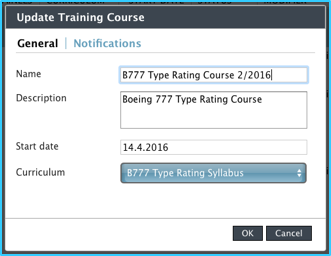
On the General tab, following info can be inserted:
- Name of the course
- Description of the course
- Start date
- Curriculum, selected from the list of published Curricula
On the Notification tab, certain events can be selected to create a notification for a group of subscribers. These can be individual users, user groups or both.
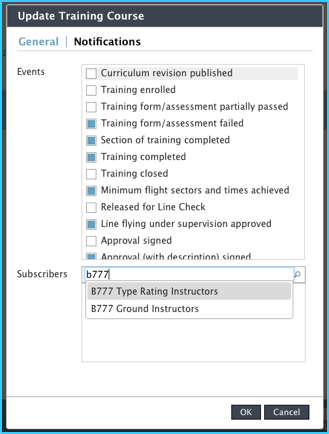
Notifications will be sent to these users’ email addresses.
After creating the new Training Course, its status will be “Planned” by default. To enrolle trainees, see section Toolbar button “Trainees”.

By selecting an existing Training Course from the list and using Toolbar button “Edit”, an Update Training Course dialog window will open. The dialog is the same in previous (Toolbar button “New”) with the exception that for technical reasons the Curriculum can not be changed once the Training Course has any other status than “Planned”.
By selecting an existing Training Course from the list and using Toolbar button “Delete”, a confirmation dialog opens for confirming the deletion of selected Training course.
Managing training course enrollments
By selecting an existing Training Course from the list and using Toolbar button “Trainees”, a special Trainees view will open.

From this submenu, training manager can:
- Manage trainee enrollments
- View individual trainee’s course progress
- Print training certificates for trainees
Toolbar buttons in this menu are:
- View – View single trainee’s syllabus and its progress. This view is only active when the training course is no longer in “planned” status. Note that it is not possible to complete training course items via this view.
- Certificate – Export Training Course certificate for selected user. Active only when Training Course is no longer in “Planned” status.
- Manage – Manage trainee enrollments, add and remove trainees.
To add or remove trainees, click “Manage” to open following “Manage Trainees” dialog:
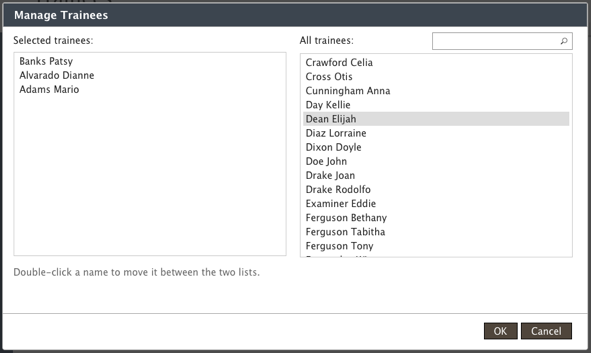
Trainees are added and removed by double-clicking users.
Training course progress
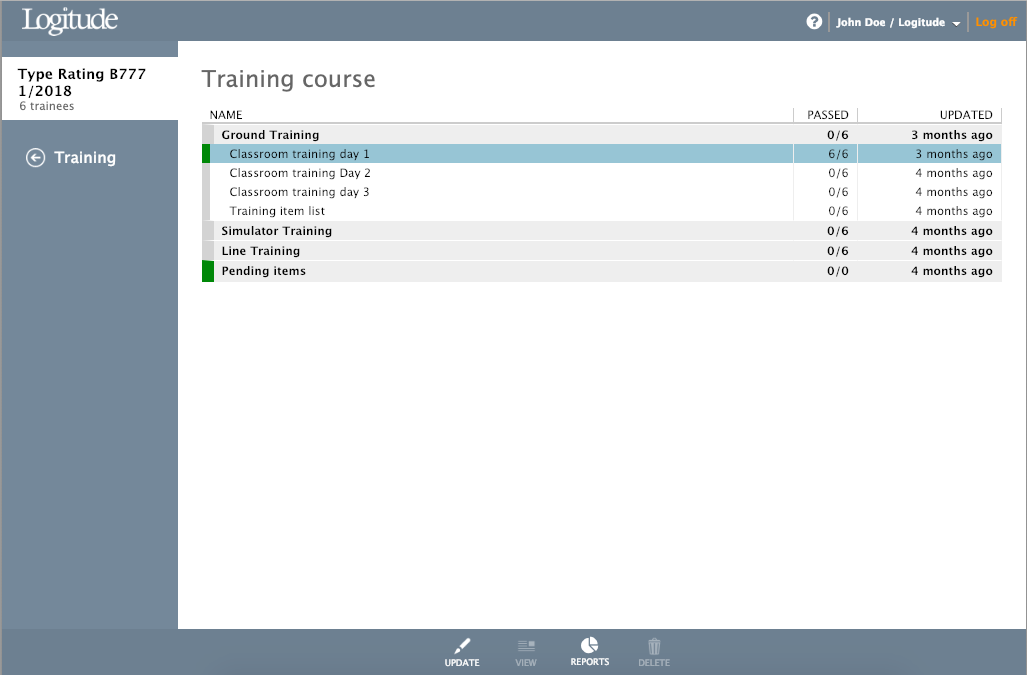
By selecting an existing Training Course from the list and using Toolbar button “Progress”, a special Progress view will open. This is the default view used to manage Training Courses once they are active. Double-clicking Training Course on the Enrollments tab list will open Progress view by default.
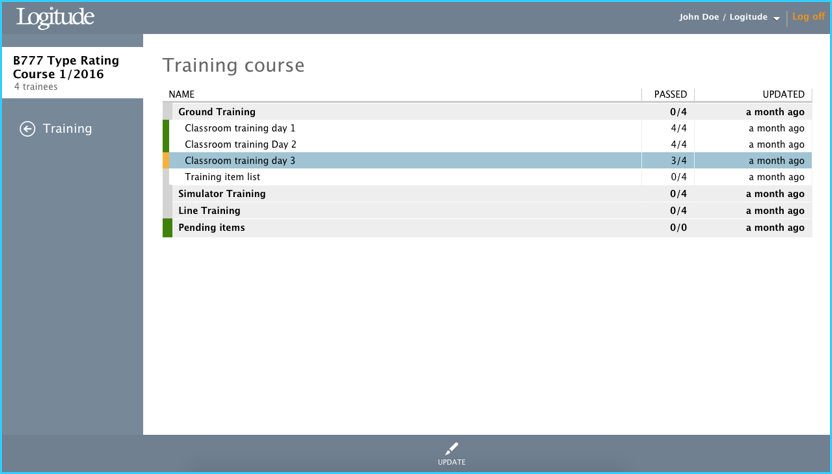
Progress view shows all sections of the training course and their status on the column “Passed”. To open sections, click the header and list of training items inside the section are shown. Once again the “Passed” column shows how many participants have passed either each section or training item.
Changing training course status
By selecting an existing Training Course from the list and using Toolbar button “Status”, a small popup list opens for changing course status. The course status is always one of the following:
- Planned
- Enrolled
- On hold
- Closed
When a new Training Course is created, the status is “Planned”. To activate the course, status needs to be changed to Enrolled. After the status has changed to “Enrolled”, it is not possible to return to “Planned” status.
Enrolled course can be either put on hold or closed. If the training course has been halted for some reason and will be continued later on, the “On hold” status will indicate that the course is not active at the moment. The course can be re-activated from this status to “Enrolled” status.
When course status is changed to “Closed”, the course is removed from Enrollments view and moved to Training records view, which houses all completed training courses as training records. It is not possible to reactivate closed training courses.
Reports tab
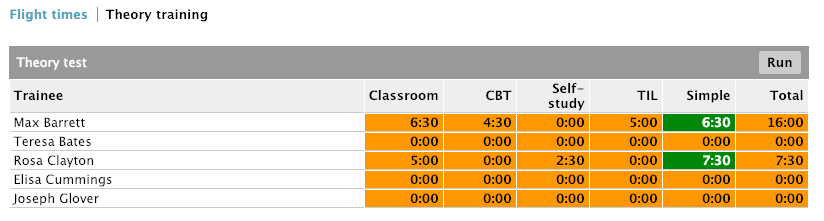
Reports are configured from the Reports tab. There are two types of reports, Flight times and Theory training. Running of these reports can be done either via Reports tab, or via training course progress view.
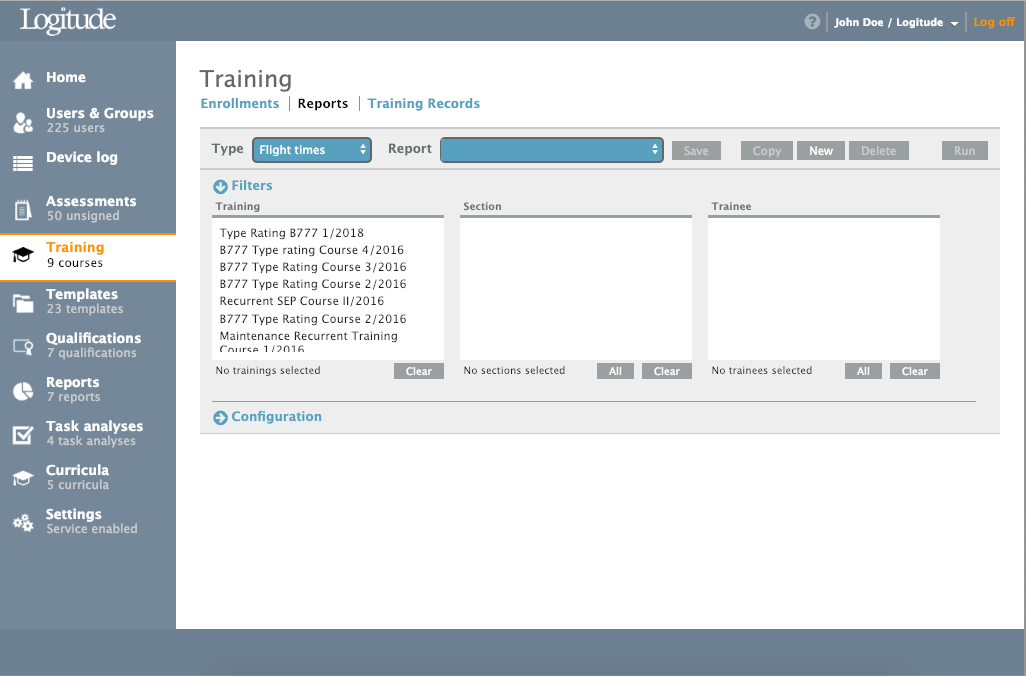
Create and configure new report
First select the report type: Flight times or Theory training. After selection the previously saved and configured reports are listed on "Reports" dropdown-menu. New report can be created by clicking "New" button. You can also duplicate an existing report by clicking "Copy" and remove existing reports by clicking "Delete".
Configure new report by selecting desired filters. Training course must be selected in order the report to function. Section and trainee filters can be left empty, or have multiple selections.
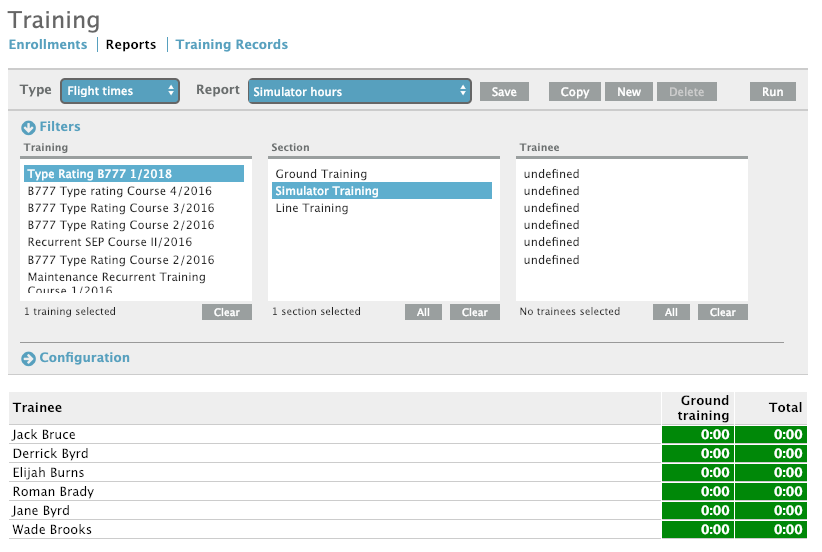
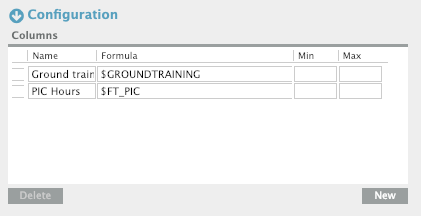
Once filters have been configured, proceed to Configuration. Insert fields by giving them name and then formula for calculating the hours. Min and Max fields set the color coding to the calculated hours. If value is less than configured Min value, the figure will be shown on yellow. If value is more than configure Max value, the figure will be shown on grey.
To calculate FT_PIC and FT_SPIC hours, the training course must have template with same name of flight time fields (FT_PIC and FT_SPIC) configured.
Here are few examples for configuring the formulas:
- $FT_PIC - Sum all FT_PIC hours
- $FT_SPIC - Sum all FT_SPIC hours
- $FT_PIC + (MIN($FT_SPIC,55)) - Sum of all FT_PIC hours + minimum of following: (sum of all FT_SPIC) or 55 hours
- $GROUNDTRAINING - Sum all ground training hours
Report configuration must be saved before the report can be run.
Run report from training course progress view
Reports can also be run from training course progress view. Proceed to training course progress view by selecting training course from Enrollments tab, and then clicking "Progress" button from the Toolbar. Then click "Report" on the Toolbar of the progress view.
Training Records tab
All training courses that have “completed” as their status are listed on the Training records tab for viewing and archive purposes. It is not possible to reactivate these courses or change their contents.
To view training records, select the training course from the list and then “View” button from the toolbar.
Viewing the training records is very similar as the progress tool in enrollments tab for planned and active courses. Only difference is that no modifications can be made.
Working with Training courses
Process with Training Courses is following:
- Create Training Course via toolbar button “New” on the Enrollments tab.
- Enroll users to the Training course via toolbar button “Manage”.
- Active course by changing its status to “Enrolled” via toolbar button “Status” 4. Update Training Course progress, view and mark Training Course items as complete via toolbar button “Progress”
- WhenTraining Coursehas finished, close the Training Course by selecting its status to “completed”.
- View Training Course archives via “Training Records” tab
To view and update training course progress, the Progress view is used. Select the training course from Enrollments tab and click toolbar button “Progress”.
Progress view of a training course:

Progress view shows training course contents as created in Curricula Editor. In this screenshot above, section "Medical Emergencies" is opened, and it contains the training elements “First Aid CBT” and “First Aid Classroom training”.
On the left side of each section and element, there is traffic light indicator if the section or element is in progress (amber) or fully completed (green). More detailed information of the individual element progress can be seen from the “Passed” column, which gives a quick overview on how many trainees have passed either whole section or single training element.
To view individual training element status or to check it as complete for trainees, select the element from the list and click toolbar button “Update”. Or just double click the training element. See following chapters for further guidance on how to update different training elements.
Note. Only approved users can check training elements as complete. Approvers for each training element are defined in Curricula Editor.
Completing classroom trainings
In this example we have a classroom training element which we will update:
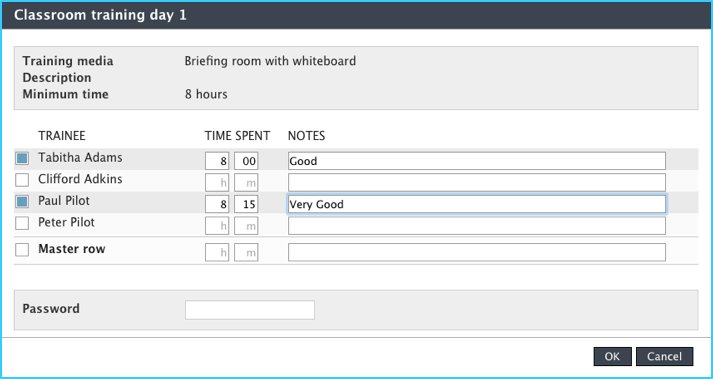
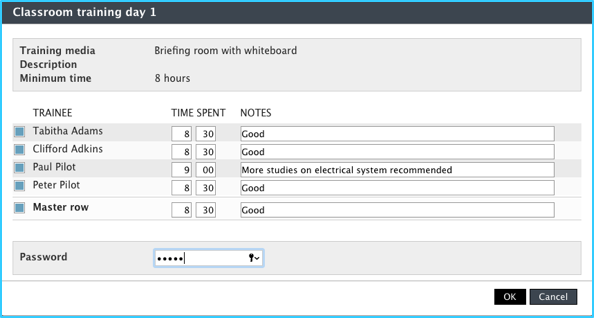
To update training element’s progress, the approved user can either select each individual trainee and their time spent and comments, or use the “Master row” function below to simultaneously update all Trainees fields with same information. All approvals are verified by inserting the user’s password.
Updating training item “Classroom training day 1” for trainees Tabitha and Paul only. Start by checking the boxes on the left side of the trainees, and then input the “Time spent” fields, which must be equal or more than minimum time shown on the header. Notes are optional.
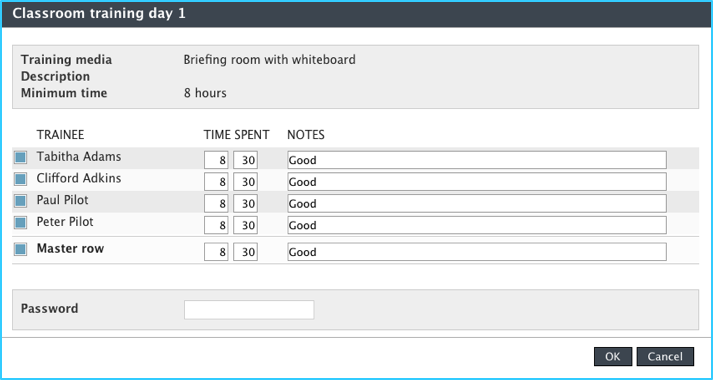
In case of all trainees were on the class and instructor wants to complete the training element for all of them, the “Master row” function is ideal for this purpose. Ticking the checkbox next to the master row activates the master row “time spent” and “notes” fields. Any input written on these fields will automatically copy to all trainees corresponding fields:
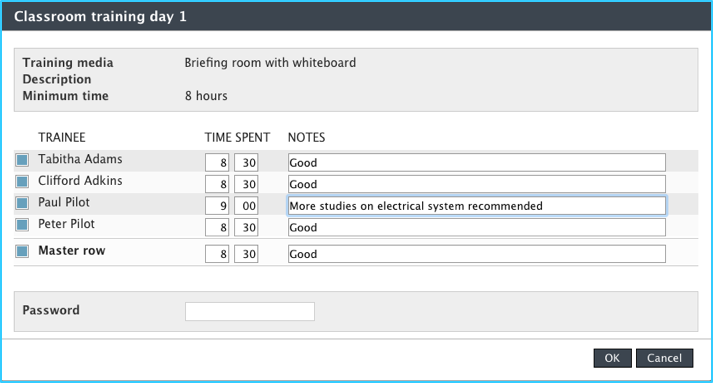
Tip: Use “Master row” to initially update fields for all trainees. Then make individual comments and edits before inserting the password to approve the trainings:
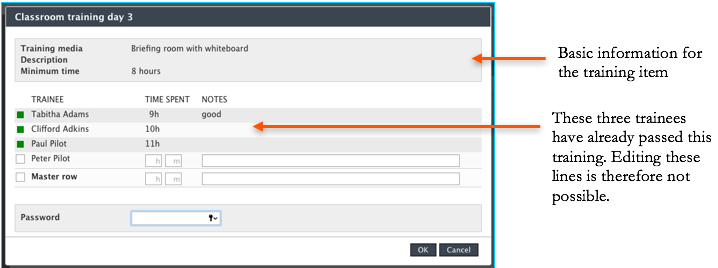
To approve selected rows, insert the password and then click “OK”:
The training element has now been updated. This is indicated also in the Progress view, as the Passed status on the Classroom training day 1 shows now 4/4 – Four trainees of total 4 trainees enrolled have passed this training item.

To return back to Training view, click link “Training” on the left menu.
Completing exam trainings
Exams are very similar to other training elements. The difference is the maximum number of attempts allowed and the minimum result required, which both are configured in Curricula Editor.
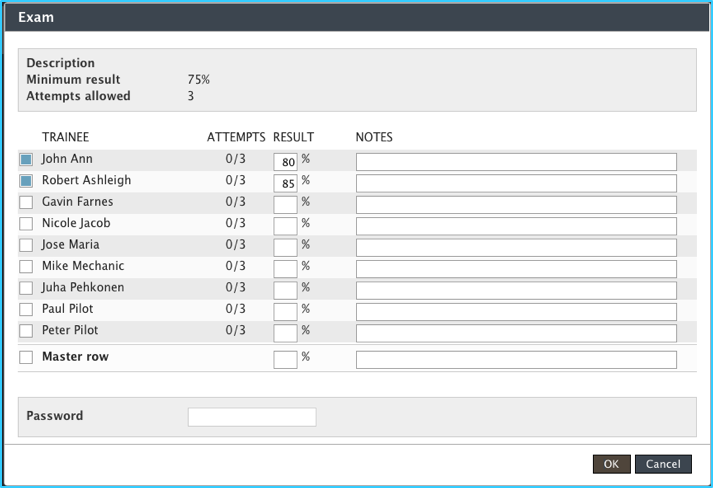
On this screenshot above, we have an example of Exam training element. Note that on the header the minimum result is defined as 75% and maximum number of attempts is 3.
To insert the exam results for trainees, just insert the result and possible notes to applicable fields. Password is required to confirm these training elements to be completed.
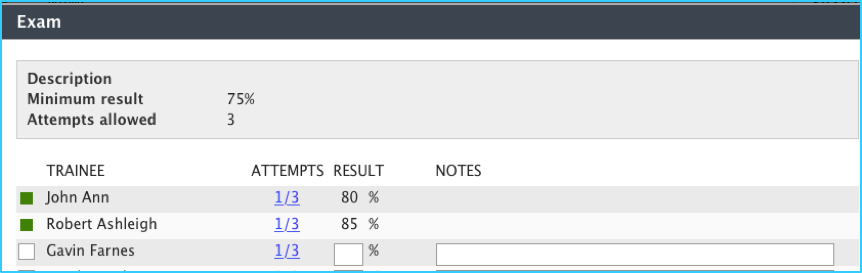
In case of user does not achieve the minimum required result, one attempt is used. In this example below, trainee Gavin Farnes scored 60% from the exam. Now that the Exam dialog is opened again, we can see that he has used one of his three attempts.
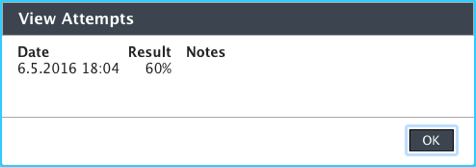
Clicking the Attempts –link opens “View Attempts” dialog with results and timestamps of each attempt:
Completing simulator trainings
In case of simulator trainings, the Training Course actually creates a new assessment from a template defined in Curricula editor. Created assessments are then linked to the training course and these assessments do not show in Assessments menu’s Assessment monitor or Assessments list.
In this example we have training element Pilot Proficiency Check B777 – EASA – Basic under the “Simulator Training” section:
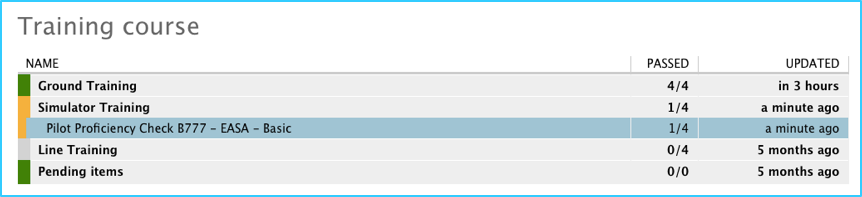
Double clicking the training element opens the element dialog:
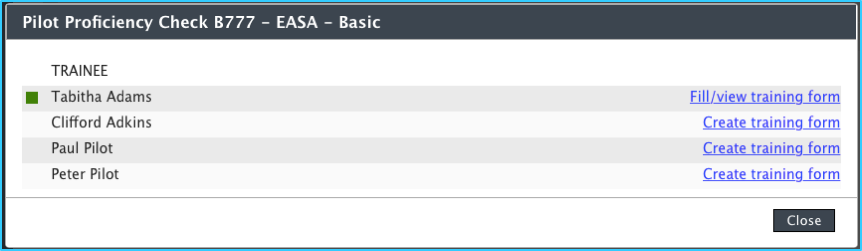
As seen on the screenshot above, trainee Tabitha Adams has already completed the simulator training. This is indicated as a green traffic light indicator on the left. The link on the right, “fill/view training form” would open the assessment form for Tabitha.
For the other trainees, the training form has not been created yet, as the link says “Create Training Form”. To create one, click the link. The “New Training Form” dialog opens, with template and examiner prefilled. These cannot be changed.
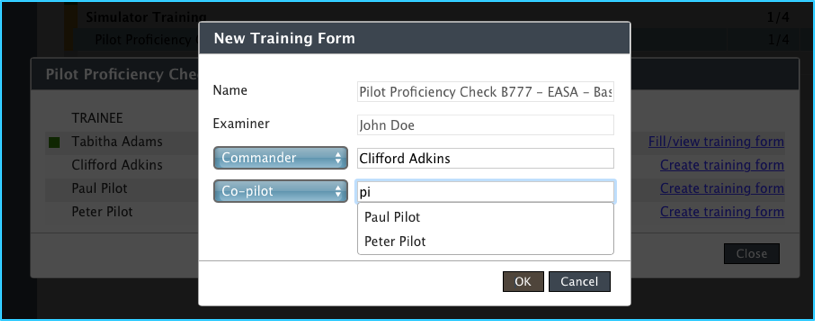
Select the correct role for the trainee from the dropdown menu on the left. If required, second trainee can be added to the same training form.
The training forms created via Training Courses are not visible in Assessments menu, neither in Assessments monitor nor Assessment tabs. Only way to access these training forms for training courses is via the course itself.
Completing Training Item List Trainings
The Training Item Lists can be used for various purposes in a Training Course. In this example, training organization has created a Training Item List containing all discussion topics that need to be completed during the line training.
Double clicking the Training Item List element opens following dialog:
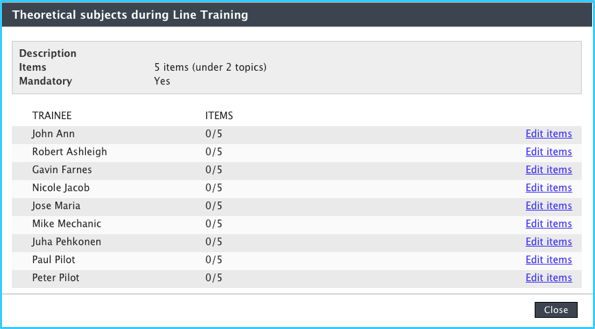
Items column shows immediately the status of each trainee. Clicking the “Edit items” link opens the dialog for updating the items. In this example, we will mark the “Metar & TAF” item as complete with following notes:

Completing Line Flying Under Supervision Trainings
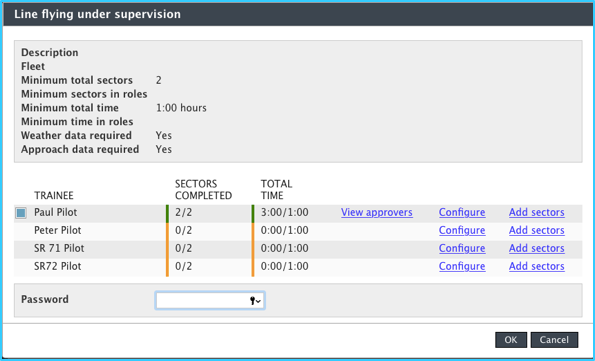
Next we are going to see how to manage line training sectors in a Line Training Under Supervision (LIFUS) training element. Double clicking the LIFUS element opens following dialog:
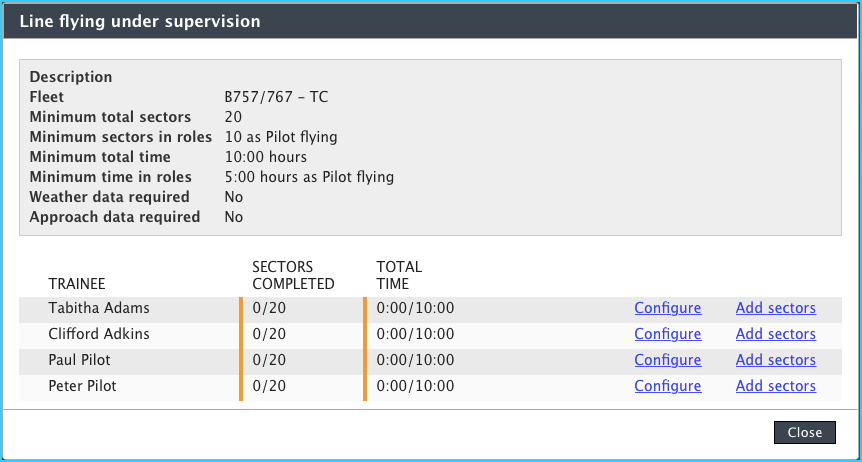
In the header, the LIFUS description contains the minimum requirements for the training. All trainees and their completed sectors and total time are listed below.
To add LIFUS sector, click “Add sectors” link next to a trainee. This will open “Flight Sectors” dialog for the trainee.
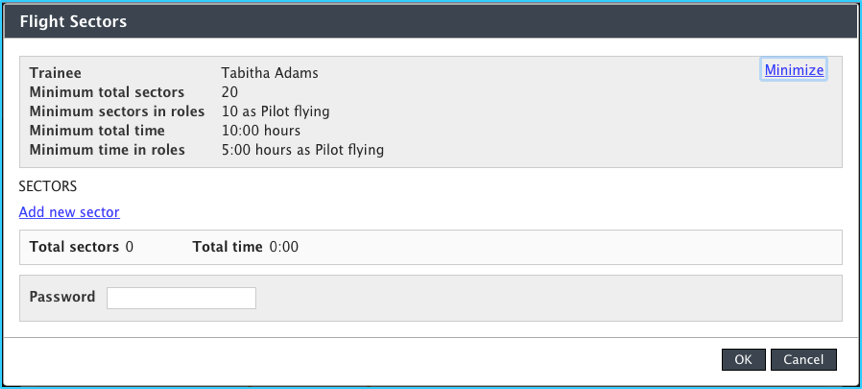
In this example above, the “Flight Sectors” dialog is still empty as there are no sectors. Let’s add one by clicking “Add new sector”.
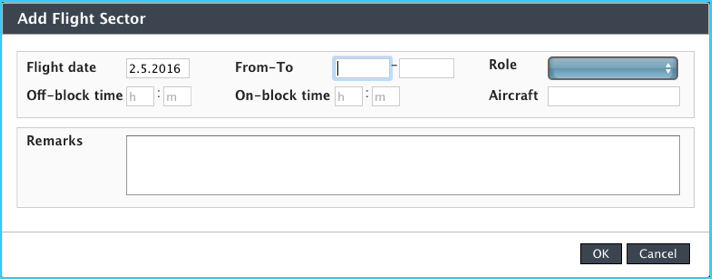
The “Add Flight Sector” dialog contains data input fields for adding the sector:
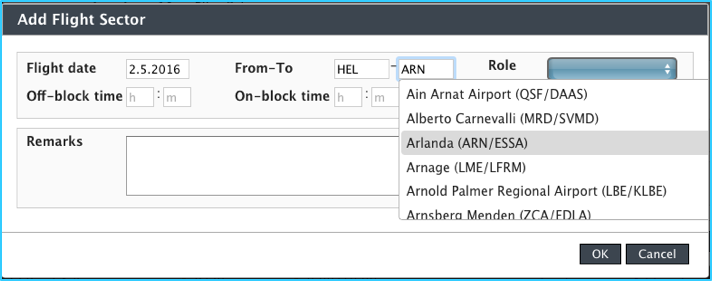
The From-To fields support built-in search tool for airports. Just start typing the airport name, ICAO or IATA code and search results will be listed on the dropdown menu:
After inputting all required information, click OK and the added sector comes visible to the previous dialog, “Flight Sectors”:
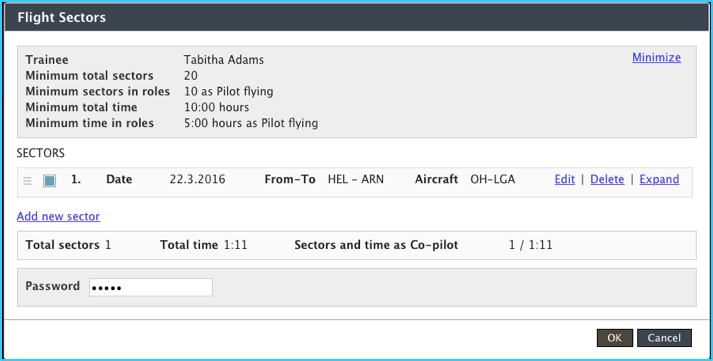
To approve the added sector, insert the password and click OK.
After the minimum LIFUS requirements are met, the user defined as “content approver” (defined in Curriculum editor) can then complete the whole LIFUS element for trainee.
Once the minimum requirements of LIFUS element are met for a trainee, a checkbox will show up on the LIFUS dialog next to the trainee.
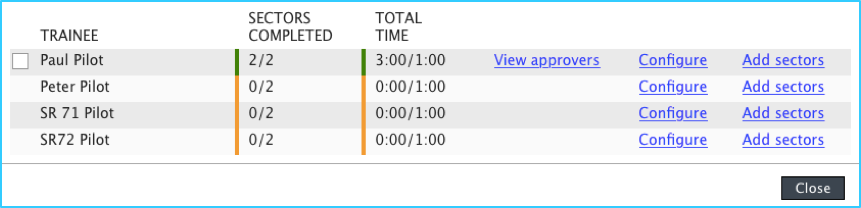
On this screenshot above, Paul Pilot has reached minimum required number of sectors and total time. Note the checkbox on the left side of the trainee’s name.
Clicking this checkbox brings up the password field:
Inserting password and clicking OK will complete the LIFUS element for selected trainee.
Monitoring trainee progress
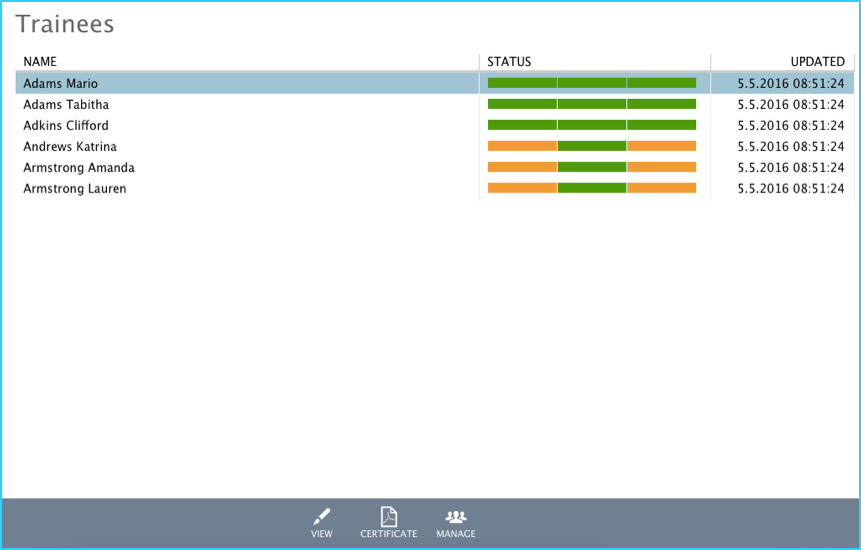
To monitor individual trainees’ progress on a training course, the Trainee view gives the best overview for each trainee. To open Trainee view, select the Training Course from the Enrollments tab list and click “Trainees” toolbar button.
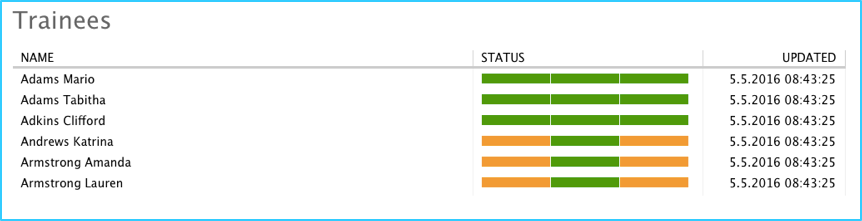
On the Trainees view, all trainees are listed and the status column shows quick overview on the training course sections. Once again the traffic light indicator shows that green blocks are completed sections while amber are still in progress. Not started sections are shown with grey color.
To see more detailed view on single trainee’s completed training items and possible attachments on his/her training file, select the trainee from the Trainees view list and click toolbar button “View”.
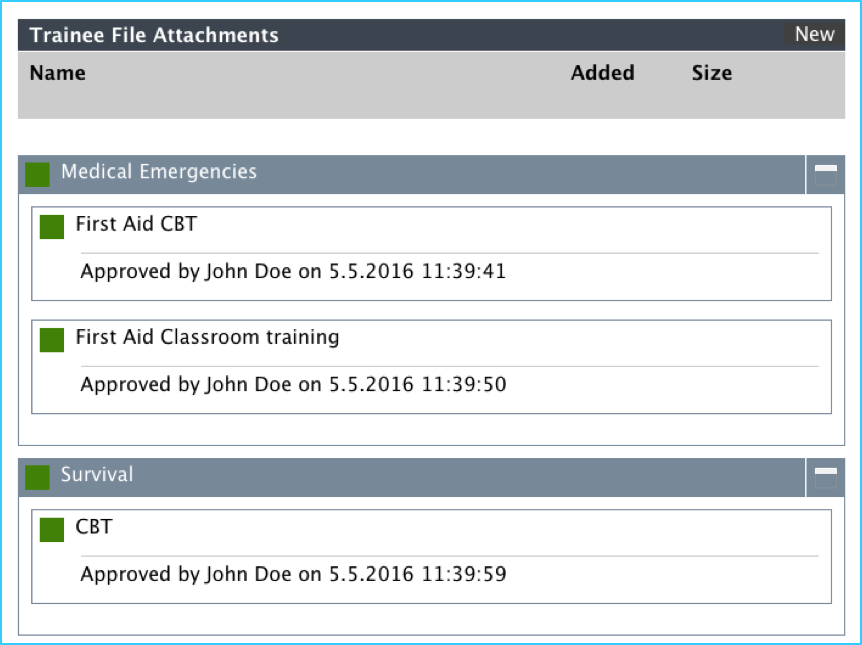
Each training item can be reviewed for completion date and time, and approver.
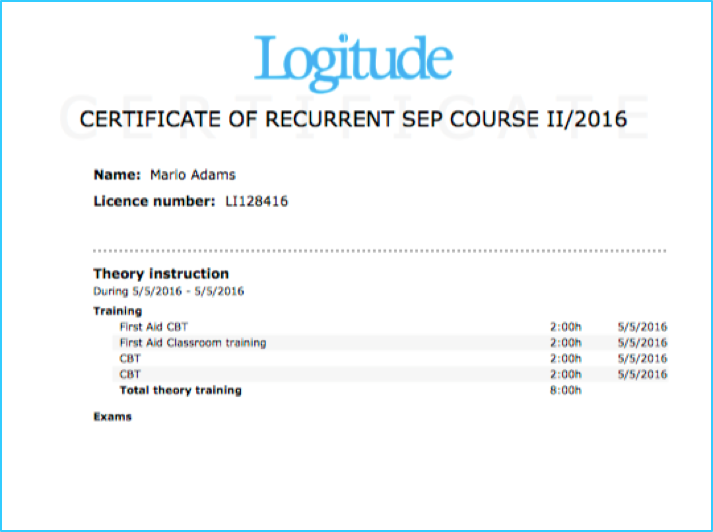
Exporting certificates for trainees
Once trainee has completed all required items, a training course certificate can be exported from the Trainees view. Select trainee and then click “Certificate” toolbar button.
Certificate layout can be tailored to have company logos and layout. Please contact Logitude support for more information.