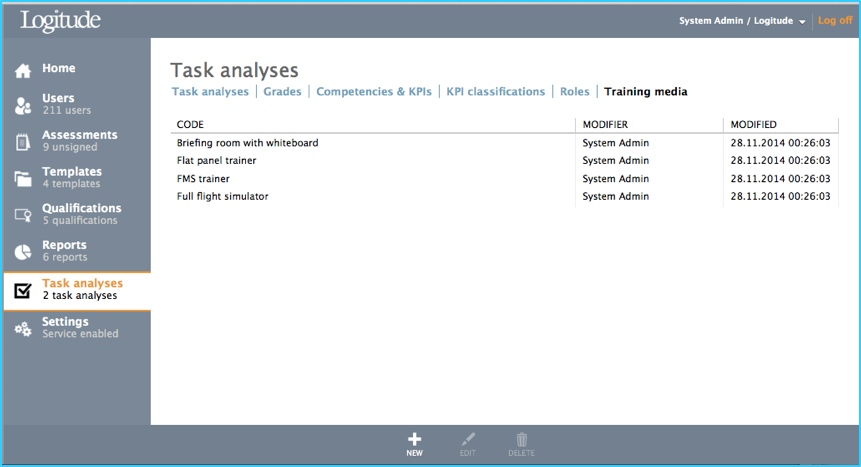
In the Task analyses section of ETR you can do the following:
- Create and maintain the Task Analyses task lists and associated data within the tasks
- Export Task Analyses to a file for external editing as required
- Maintain the grading scales per task analysis
- Maintain the Competencies and KPIs (reason codes)
- Maintain Roles definitions
- Maintain Training media definitions

Task analyses tab
Creating, editing (the basic info), copying or deleting Task Analysis
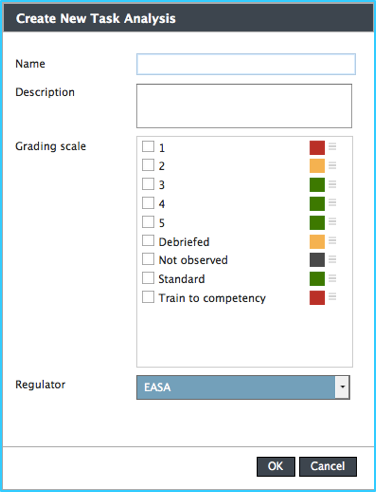
To create new Task Analysis (TA), click toolbar button “New” and a "Create New Task Analysis" dialog window will open. The necessary information for creating a new template is input with this dialog. See following table for details about each input field in the dialog.
| Field | Description |
|---|---|
| Name | Name of the new task analysis (TA). Mandatory. |
| Description | Description for the TA. |
| Grading scale | Available grades (defined under Task analyses > tab Grades). The ones which are required/used, should be ticked, and ordered as required (with the ladder symbol beside the colored square symbol. The order of the grades will be the same order they are presented on assessment forms. |
| Regulator | The local regulator should be selected if the regulator PDFs are going to be used, i.e. the proficiency check and skill test assessment data will be used to generate a Regulator approved PDF form. |
Editing of Task Analysis is done by selecting an existing Task Analysis from the TA list and using Toolbar button “Edit”. An "Edit Task analysis" dialog window will open which is used to edit the basic information of the TA. The dialog is exactly the same as in previous (Toolbar button “New”).
Copying of Task Analysis is done by selecting an existing TA from the TA list and using Toolbar button “Copy”. A "Copy task analysis" dialog will open and it is the same as the previous (Toolbar button “Edit”) but the dialog suggests by default a new name for the copy (by inserting “Copy of ” in the beginning of the TA’s name. The user may of course change the TA name also.
Deleting Task Analysis is done By selecting an existing TA from the TA list and using Toolbar button “Delete”. A Delete template dialog window will open up, prompting for deletion confirmation.
Tip! If a Task Analysis is deleted by mistake no worries! The operation can be reverted, and the TA – including ALL associated data – can easily be returned by Support.
Grades tab
The grades which will be used in form templates are configured under the Grades tab. Grading scales are defined per Task Analysis, so each TA can have different grading scale if necessary. Once the individual grades are created they can be assigned to the TA.
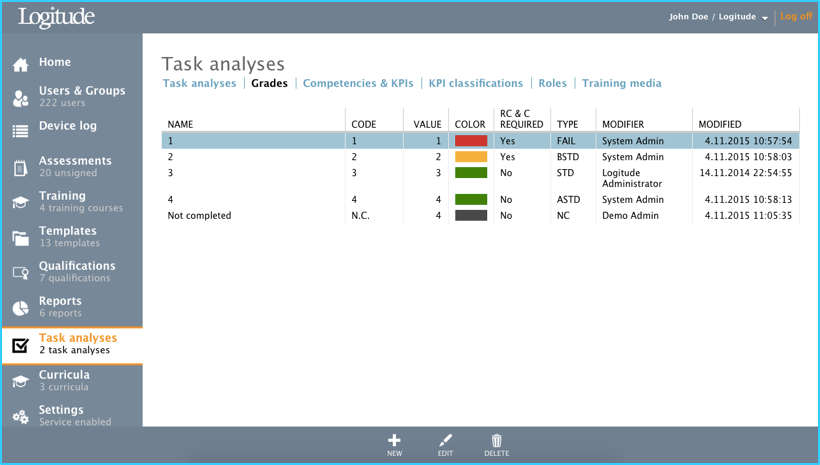
Creating, editing and deleting Grade
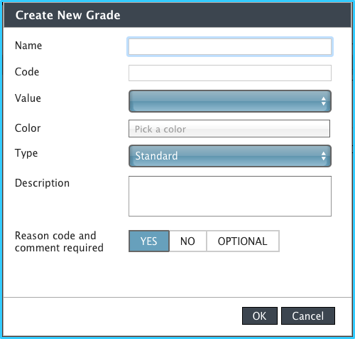
To create new Grade, click Toolbar button “NEW”, and a Create Grade dialog window will open. The necessary information for creating a new grade is described in the table below.
| Field | Description |
|---|---|
| Name | Name of the Grade. Shown on the grading buttons on the assessment forms |
| Code | Code of the grade, used in Reports to identify different grades in statistics. |
| Value | Value of the code. 1-10. With different grade values it is possible to create different levels of performance if required. |
| Color | Color for the grade. Is shown on the tasks’ buttons to identify the given grade. |
| Type for the grade | Available types are: Above standard / Standard / Below Standard / Fail / Not completed |
| Description | Description of the grade |
Reason code and comment required
- Yes - this grade always requires both reason code and comment before the grading is complete
- No – Reason code and comment are not required and depending on the grading schema, are not shown to user
- Optional - reason code and comment can be always given, but it is not required
To edit Grade, select an existing Grade from the grades list and click toolbar button “Edit”. An "Update grade" dialog window will open which is used to edit the grade’s data. The dialog is the same as in previous (Toolbar button “New”) with the exception that for technical reasons the Code can not be changed once it has been selected when initially creating the Grade.
To delete Grade, select an existing Grade from the grades list and click toolbar button “Delete”. A "Delete Grade" dialog will open up, prompting for deletion confirmation.
Competencies and KPIs tab
The competencies and Key Performance Indicators, KPIs, are used in ETR to categorize possible trainee/crew performance problems. This chapter describes how Competencies and KPIs are created. KPIs are also referenced as “behavioral indicators” in this document.
Details on how KPIs are used in Form Templates, and in Assessment forms, are described in The Task Analysis Editor Toolbox and Completing the tasks, respectively.
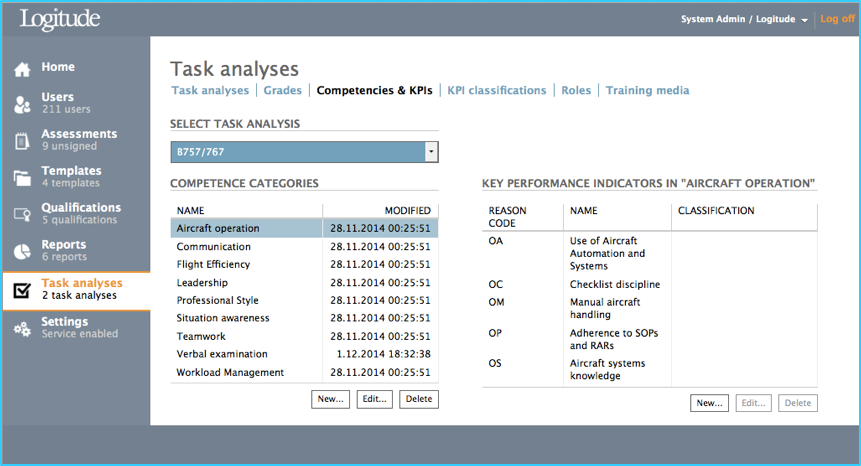
Creating, editing and deleting Competence Category
By using button “New” under the Competence categories section of the page, a dialog will open with a single input field “Category name”. By inputting a name and clicking “Ok” the new Category will be created.
By selecting an existing Competence category from the list and using button “Edit” under the Competence categories section of the page, a dialog will open with a single input field “Category name”. By editing the category name and clicking “Ok” will save the new name.
By selecting an existing Competence category from the list and using button “Delete” under the Competence categories section of the page, a dialog will open prompting deletion confirmation.
Creating, editing and deleting Key Performance Indicator (KPI)
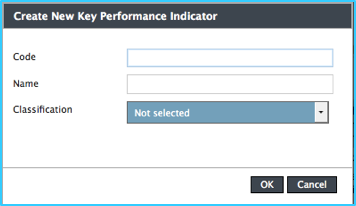
By using button “New” under the Key Performance Indicators section of the page, a “Create New Key Performance Indicator” dialog will open. The necessary information for creating a new KPI is input with this dialog.
| Field | Description |
|---|---|
| Code | Code of the grade, shown in TA Editor and Template Editor Toolboxes and used as the button caption on assessment forms’ reason code buttons. |
| Name | Name of the Grade. Shown whenever the detailed name is shown, e.g. when a Reason Code has been clicked on an assessment form in the iPad application, when hovering mouse over the reason code in the web application and in the debriefing view in the iPad application. |
| Classification | Classification of the KPI. The dropdown’s content is maintained under the “KPI classifications” tab. See KPI classifications tab |
Button “Edit” By selecting an existing KPI from the list under the Key Performance Indicators section of the page and using button “Edit” underneath it, an “Edit Key Performance Indicator” dialog will open. The dialog is the same as in previous (Toolbar button “New” open).
Button “Delete” By selecting an existing KPI from the list and using button “Delete” under the Competence categories section of the page a dialog will open prompting deletion confirmation.
KPI classifications tab
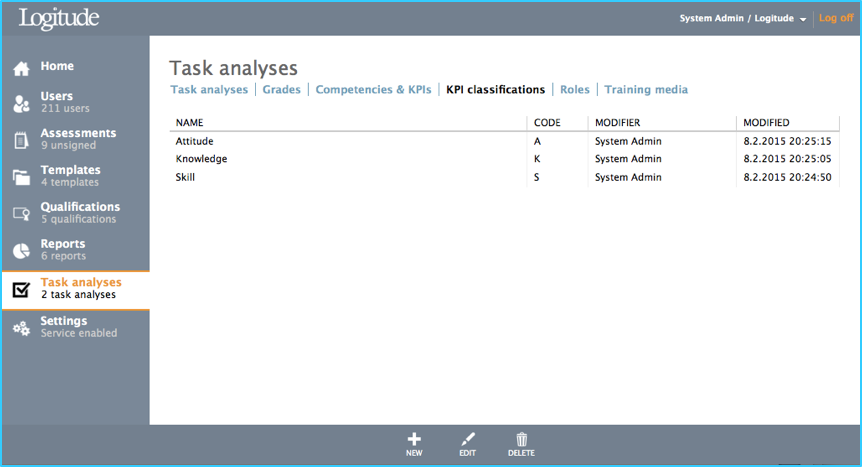
To create new KPI Classification, click toolbar button “New” under the KPI classifications tab. A “Create New Key Performance Indicator” dialog will open. The necessary information for creating a new KPI is presented in the table below.
| Field | Description |
|---|---|
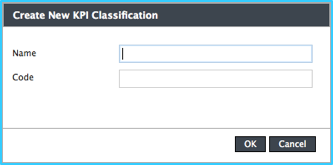
| Name | Name of the KPI classification. Shown in the Classification dropdown list in the Create / Edit Key Performance Indicator dialogs. |
| Code | Code of the KPI classification. |
To edit KPI Classification, select an existing KPI classification from the list under the KPI classifications tab and click toolbar button “Edit”. An “Edit KPI Classification” dialog will open. The dialog is the same as in previous Toolbar button “New”.
To delete KPI Classification select an existing KPI classification from the list under the KPI classifications tab and click toolbar button “Delete”, which will open a dialog will open prompting deletion confirmation.
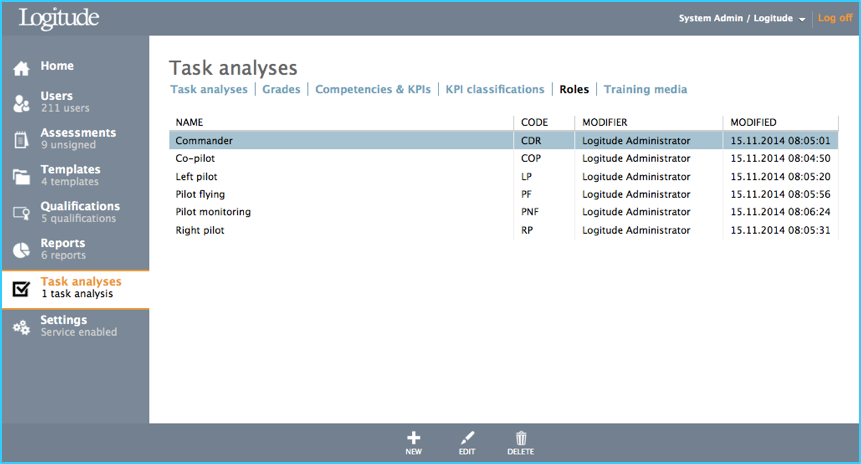
Roles tab
Roles are used to inform the instructor / examiner to which trainee he/she should concentrate when evaluating a particular task. If the role has been assigned to the task in the TA editor, it is displayed as read-only in the task when it is opened on an assessment form. In most cases AQP/ATQP regulations require that the roles are defined for all tasks evaluated/trained under the program.
To create new Role, click toolbar button “New” under the Roles tab. A “Create New Role” dialog will open. The necessary information for creating a new Role is described in the table below.
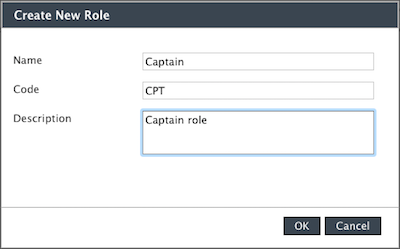
| Field | Description |
|---|---|
| Name | Name of the Role. |
| Code | Code of Role. Shown on the Role elements in TA editor and in assessment forms as read only when performing an assessment. |
| Description | Description of the role. |
Toolbar Button “Edit” By using button “Edit” under the Roles tab, a “Edit Role” dialog will open. The dialog is the same as in previous (Toolbar button “New”)
Toolbar Button “Delete” By selecting an existing Role from the list under the Roles tab and using toolbar button “Delete”, a dialog will open prompting deletion confirmation.
Training media tab
In most cases AQP/ATQP regulations require that the minimum Training media are defined for all tasks evaluated/trained under the program.
To create new Training Media, click toolbar button “New” under the Training media tab. A “Create Training medium” dialog will open. The necessary information for creating a new Training medium is described in the table below.
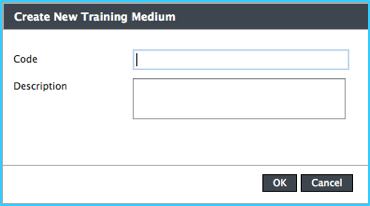
| Field | Description |
|---|---|
| Code | Code (type) of the Training medium. Shown in the Minimum training medium dropdown list in the Task Analysis editor. It is also shown on the assessment form when a task is opened. |
| Description | Description of the Training medium. |
To edit Training Media, select existing Training medium from the list under the Training media tab and click toolbar button "Edit". An “Edit Training Medium” dialog will open. The dialog is the same as in previous Toolbar button “New”.
To delete Training Media, select existing Training medium from the list under the Training media tab and click toolbar button “Delete”. A dialog will open prompting deletion confirmation.